This is demonstrating why you absolutely do not pour water on a grease fire.
holy shit
Okaaaay. If any of you actually have a grease fire in the kitchen put the lid on the pan. It will suffocate the flames. Don’t pour water on it, and don’t freak out. Cook safely!
Or throw flour on it to smother it.
/quick safety announcement
NO, DO NOT USE FLOUR, DO NOT USE FLOUR TO SMOTHER A FIRE.
YOU HAVE TO USE BAKING SODA.
Throwing flour into a fire can cause it to combust and make the fire worse because FLOUR/SUGAR IS FLAMMABLE. One cup of flour into a grease fire can have the explosive force of dynamite.
The reason you use baking soda is that it releases carbon dioxide when heated, and CO2 is a fire suppressant.
M-most people don’t t-talk like th-this when they st-stutter from n-nerves.
It’s more…it’s more like going back and…and starting over. Maybe repeating some, some words.
Bonus tip: this is ESPECIALLY true in thoughts. Thoughts are a lot more fluid than speech because there’s no physical barrier to get past when they form into words.
Thank you for the tips!
Stuttering like this is closer to what happens when somebody’s got a speech impediment that makes it difficult for them to form words. It’s not that it doesn’t happen, it’s just that it happens in different circumstances from what people think! Like OP said, somebody who’s got no speech impediment but is stuttering when they’re nervous is gonna sound more like:
“I… I don’t… This can’t… No, I-I don’t have ANY idea what’s happening here.”
…rather than: “I-I d-don’t have an-ny id-d-dea what’s h-happening here!”
[[ Source. Original creator: wats6831. Additional information and images linked under each one. ]]
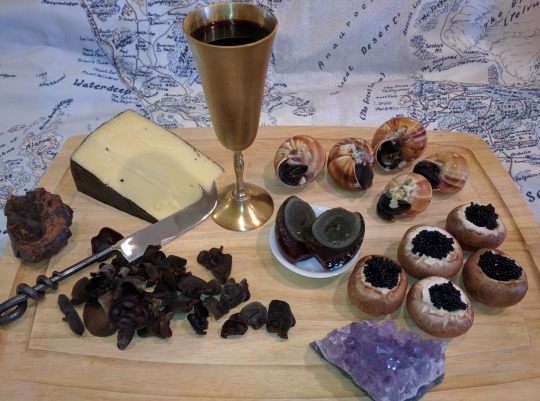
Universal:
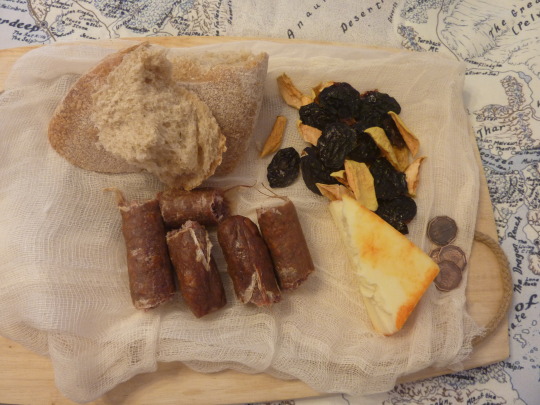
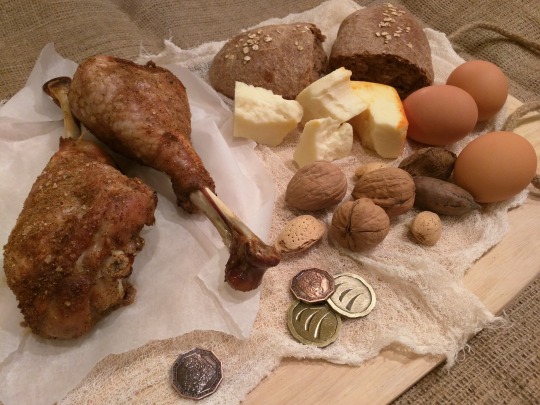
Homemade artisan herb bread, home grown and dried apples and prunes, uncured beef sausage, munster cheese. Made a small bag from cheesecloth and tied it closed.
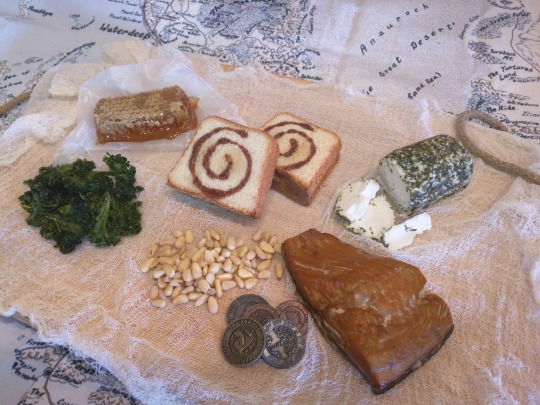
Top left to right: Evereskan Honey Comb, Elven Travel Bread (Amaretto Liquer Cake with custom swirls), Lurien Spring Cheese (goat cheese with garlic, salt, spices and shallots), Delimbyr Vale Smoked Silverfin (Salmon), Honey Spiced Lichen (Kale Chips), and Silverwood Pine Nuts.
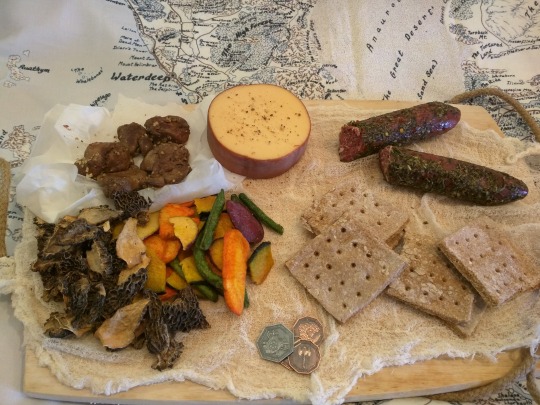
From upper left: “Honeytack” Hard tack honey cakes, beef sausage, pork sausage mini links, mini whole wheat toast, cranberry cheddar cheese mini wedge, mini pickles, pumpkin and sunflower seeds, lower right is my homemade “travel cake” muesli with raisins, golden prunes, honey, eggs and cream.
Orcs aren’t known for their great cuisine. Orcs prefer foods that are readily available (whatever can be had by raiding), and portable with little preparation, though they have a few racial delicacies. Toughs strips of lean meat, bones scavenged from recent kills, and dark coarse bread make up the bulk of common orc rations.Fire roasted rothe femur (marrow is a rare treat) [beef femur], Strips of dried meat (of unknown origin) [homemade goose jerky], foraged nuts, only edible by orcs….nut cracker tusks [brazil nuts], coarse black bread, made with whatever grains can be pillaged [black sesame bread], Pungent peppers [Habanero peppers stuffed with smoked fish and olives].
Lizardfolk are known to be omnivores, forage for a surprising variety of foods found within the confines of their marshy environs, in this case the Lizard Marsh near Daggerford. Fresh caught boiled Delimbyr Crayfish on wild chives, coastal carrageen moss entrapping estuary brine shrimp (irish moss, dried brine shrimp), Brackish-Berries (blackberries), Blackened Dart-Frog legs (frog legs) on spring sprouts (clover sprouts), roasted bog bugs on a stick!
From top left: Menzoberranzan black truffle rothe cheese (Black Knight Tilsit), Donigarten Moss Snails (Escargot in shallot butter sauce), Blind cave fish caviar in mushroom caps (Lumpfish caviar), faerzress infused duck egg imported from the surface Realms (Century egg), Black velvet ear fungus (Auricularia Black Fungus Mushroom).
Hello. So one of my biggest complaints of the D&D 5e Player’s Handbook is that searching for spells is a bit of a pain. Even if you manage to obtain a pdf file of it, many of the spells’ titles are written l i k e th i s, making it quite difficult to search with the classic ctr-F.
Because of this, I created a pdf of all of the spells that are in the book, complete with a table of contents linked to them, so you can search the table of contents for your spell, and then zip to the spell you need. Very useful, if I’m allowed to say.
Behold. It is on dropbox, though you can view it (without the magical zipping) without a dropbox account.
This is how I draw hands. I simplify the shape and then later I will add the necessary details. It makes it easier to get them right. But the only way to learn how to draw hands is to just keep drawing them.
Hello! Co-mod @codenamecesare here. Volunteers, you have made incredible progress on this project. We actually have completion of all past episodes in sight!
If you’d like to contribute to TAZ transcripts– again, or for the first time– we can use help the most on our earliest missing transcripts, three episodes of the Crystal Kingdom arc and one from The Eleventh Hour. (Links go to the transcript documents.)
For TAZ fans who rely on transcripts, these missing pieces keep them from progressing to all the other transcripts our hard-working volunteers have provided. So while we also have documents for the live shows and The The Adventure Zone Zone episodes to work on (you can find info about those in the tracking document), I want to encourage people to make these four transcripts a priority.
Thank you to our volunteers for all your contributions. We regularly receive notes from TAZ fans with hearing impairment or audio processing issues who are able to enjoy the show because of you!
Heyo! I got asked if I could make a tutorial on digital painting so I’m gonna throw together some advice meant for people who are starting out and want to figure out exactly how this stuff all works. Because it’s hard! What I hope to accomplish here is to make painting more approachable for you.
For those of you who don’t wanna bother reading that, here are the main points:
1. Learn your program and its tools, from brush properties to layer styles. And I mean learn them. Make a cheatsheet that shows you exactly what each button and scale does, both in isolation and in conjunction with other buttons and scales. Refer to this as much as possible until it is intuitive. The end goal is to know exactly what to do to your brush’s settings to achieve a given effect.
2. It’s perfectly okay to use your sketches, linearts, and other forms of line in your paintings. They can help guide the form and there’s no need to make something fully “lineless”! I never make things “lineless.”
3. Study other people’s art and try to think how they could have possibly achieved the effects they did. You can learn a lot just by observing and mentally recreating the process stroke by stroke—muscle memory is a powerful tool at your disposal. This becomes easier to do once you’ve started doing item 1 above.
OKAY!
So where the heck do you even begin?
What I’m gonna do is try to make digital painting as approachable as possible for someone who’s never really done it. The main idea here is that digital painting is just like real painting. So if you’ve ever done real painting, you already kinda know what’s coming.
I’m gonna assume you know the basics of digital art: you can sketch, line those sketches using layers and opacity changes, and fill the lines with color, maybe even opting to add some shading…and you’ll get something like this:
You know, cell-shaded, or maybe the shading’s blended, but you’ve still obviously a line drawing with color put down on layers beneath the lines.
The next intuitive step is to try going “lineless”…but when you remove the lines you get this:
idk about you but I’m laughing at how stupid this looks
When I was first teaching myself to paint digitally, I didn’t really know how to deal with this. Without lines, the form of the subject vanished or became a mess like the above. Even if I was meticulous and careful about placing down the color such that without the lines layer turned on, the shapes fit together, it didn’t look quite right. There’d be gaps, I wouldn’t know how to incorporate the subject into a background, the contrast wouldn’t be high enough, or it’d just in general look too much like a screenshot from Super Mario 64.
Painting requires a different process than the above. You’ll have to let go of some of your habits and conventions. Such as staying in the lines. Such as fully relying on the lines. Like, I love my lines, I love my sketches—but in painting, they are guides for form, and are not the form itself. So let me go through how I approach a given painting:
My painting process starts with a sketch (here a boring portrait for demonstrative purposes). I make the opacity of the sketch layer something like 30%, and then throw down my base colors on a new layer underneath. I’m not being meticulous about the sketch itself, because again it’s just meant to guide my placement of color. I’m also not meticulous about my placement of the color.
We’re essentially sketching with color. Because ultimately what we want is for the color to take on the form and shapes conveyed by the sketch.
There’s a lot going into this about how to use value, how to shade, how to use color, etc. that I’m kinda skipping over because it takes a lot of time to explain…but there are hundreds of tutorials out there on those topics so please, google around! I found some helpful tuts that way when I was starting out.
Something I find v useful is to keep selecting colors that already exist in your image for shading and hue adjustment. This is why I start with really blendy, low-opacity brushes when throwing down color on top of the background. I can then select colors within there that are a mix of the two.
For instance, I’ll select the color of the lines here:
…and use that to shade:
And maybe I’ll select one of the darker shades around his eye, but not the darkest, to make the shading a smoother gradient…and so on.
What I do in general at this point is go over the shapes and lines of the sketch. Such that I can turn off the sketch layer and see this:
I’m replacing the lines with shading and value. I’ll continue to do this as I keep adding color.
This is all super loose. I am not dedicated to any particular stroke. I just want the colors and shading and light source to be right. I’ll use overlay layers to boost contrast or add a hue.
Here are other examples where I used this process:
I am constantly changing brushes and brush settings as I paint. It really depends on what effect I want where. I am also constantly selecting new colors and applying or blending those in. I don’t believe in having some uniformly applied base color and then shading with only one or two…that’s what I’d do if I was cell-shading like the first drawing I showed you here, but painting should be about messing with color and opacity and blending to make millions of hues!
Good rule of thumb: Hard, opaque brushes for applying color. Soft, dilute brushes for blending colors. Sometimes hard, dilute brushes can make some cool blending effects! I personally prefer harder edges on my shading so that’s a brush I use often.
This is getting a bit long so I’m gonna split it up into multiple parts, but really what I want you to get from this is:
1. learn the tools at your disposal until they are intuitive
2. sketch and line are guides for form, not the form itself
3. rather, hue and value will produce the form
And of course, practice makes perfect!!! Every drawing you make, every painting you make, will bring you one step closer to the artist you want to be, and thus every drawing and every painting, no matter what, is a success.