i use overlay all the time to make colours more vibrant and to make areas warmer or cooler. good for colourful ambient light (like glowy magic stuff).
multiply is really good for establishing a light source very quickly!! play around with the hue to get shadows with cool colours. for more detailed work you can use two or three tones on a multiply layer for more dimension.
screen is something i only recently started using regularly! it’s really great if you have a very bright light source. you can also use screen and paint on the edges of a backlit character to make the lighting more intense. a good thing to know about screen layers is that the darker the colour you use, the less it lightens; using black on a screen layer leaves no effect on the colours underneath (the opposite is true for multiply layers!).
and you can also use these layers for an entire painting instead of just on a character! i don’t have a visual example on hand, but stuff like making the area around a warm light source warmer, making a light source brighter and more vibrant, or using gradients set on multiply or screen are just some of the ways you can apply these to a full painting 🙂
Hey kids! If you’re a filmmaker, animator, or storyboard artist and you don’t know what screen direction is, you might want to read this.
For the record, there are always exceptions to the rule in filmmaking, which is why I pointed out 3 examples here.
I’ve also found that comic books tend to NOT take screen direction as seriously as film does, but I’m still on the fence if this is wise or not. My favorite comics pay close attention to screen direction so as to not confuse the reader.
Good luck!
AHHHHHHHHHHHHHHHH!!! YES
HEY, IT DOESN"T MATTER IF YOU"RE IN COMICS OR FILM, BREAKING THE 180 CAN CONFUSE THE HELL OUT OF A READER! THIS IS GOOD INFO FOR ANYONE DOING ANYTHING SEQUENTIAL! :3
Ah well lighting in animation backgrounds are done with the express purpose of guiding the eye to where the animation is going to take place – think of it like setting up spot lighting on a stage!
In fact, in a lot of cases the su team do literally set things up with what are essentially spotlights
Note that all of the characters are in areas where the light is shining. This is done because your eyes are drawn to the areas with the highest contrast, so your eyes jump to the spotlights – and by extension, the characters!
Now if i show you some backgrounds without the characters, can you guess where abouts the characters are on the stage?
Now the thing to understand about the lighting in these backgrounds is that there are some rules and guidelines that inform the colour choices and value ranges.
Scenery is divided into planes, the Foreground, Background, and the Middleground which is generally where the characters are staged.
In outdoor scenery there is also often Deep Space, which is things waaay off in the distance like mountains.
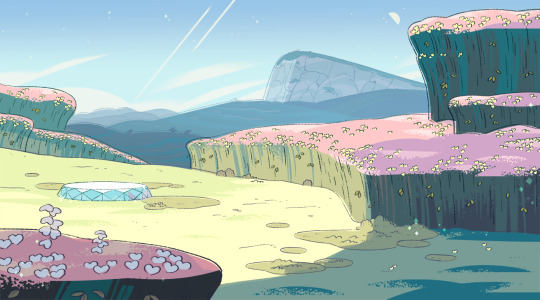
Take a look at this background for example:
This background has all of the different planes, you can flatten them each down into a solid colour
as i mention in the key there, the foreground is generally in contrast to the background and deep space.
If the background is full of cold blues and purples, the foreground is going to be warmer colours like browns and greens.
It’s also going to be on the opposite end of the value range – deep space is usually pale in colour and uses the higher end of the value range, whilst the foreground is usually darker and uses the lower end of the value range.
the colour of the sky is very important to the rest of the colour scheme! this is because of aerial perspective. It’s a simple enough concept, but it does need a little explaining
This is easiest to understand if you think of a really foggy day – you know how things get really hazy the further out in the fog they get?
This happens on regular days too! It’s just that it needs to be super far away for it to be noticeable.
So, basically, the further away something gets, the less contrast there will be and the colour will become closer to that of the sky.
The reason for this is because of the water in the atmosphere – the sun shines on it and it reflects the colour of the sky, which is particularly noticeable on foggy days due to there being so much water.
most of the time, this means that things in the distance will turn bluer, due to the sky normally being blue.
However! SU regularly takes place at different times of day, so you can see how the colour of the sky and how bright it is changes the aerial perspective
as for actually setting up the lighting, there are some simple rules to follow.
the area of highest contrast is where the viewer is going to look. To understand this better, look at the backgrounds in black and white only:
Your eyes are drawn to Beach Citywalk Fries because there is a stark contrast between the shadows and the spotlight!
It has the highest range of values going all the way through from black to white in the middleground.
The areas your eyes are not drawn to, however, only have a small range of values. The foreground goes from dark grey to black, and the background goes from light grey to white.
Generally, the foreground will be darker than the middleground, and the background will be lighter, whilst the middleground will have a full range of values.
I say generally as this is not always the case, there are lighting situations where the background will be the darkest part of the image
but they’re pretty unusual!
so in summary:
– figure out where you want the viewer to look, that should be the area of highest contrast. That means that there should be strong shadows and strong highlights.
– make use of aerial perspective to add depth to your scenery, the further away something is the less contrast it should have.
– Set your scenes up with the planes in mind, use the most values in the middleground and use opposite values for the foreground and background.
Here’s information about sexual/romantic orientations and gender identities that I put together! I..I don’t do graphic design, so this isn’t that great. Also, I’m very sorry if I missed your orientation or identity or got some information wrong. Sources: (1)(2)(3)(4)(5)(6) Flags: (1) Top photo: (1)
Ok, so initially, Paint Tool Sai doesn’t work on Windows 10 for some people. So here’s how you fix that.
First of all, go to the folder where your program is installed. This is either in your C: drive in the “Program Files” folder, or, it’s running from a separate location, either way, you can use the Windows Search option with “Sai” to find it if you’re having difficulty.
Open the folder and right click on the Sai icon that’s marked “Application”. Not the green square one, the actual application with the Sai logo.
Click “Properties” and then “Compatibility”
And click “Run Compatibility Troubleshooter”.
Allow the program to detect problems. It shouldn’t take too long, so be patient!
Click “Try recommended settings”
This pop up will tell you what mode you will need to run it in, luckily, Windows will set it for you and allow you to test it. So click the test!
Cool! It works!
If everything is fine (and it should be); click to close the troubleshooter and allow it to run one final check. If not, click explore additional options to open Windows Help, or, go back to Properties as seen in images 3 and 4, and test the different compatibility modes manually.
You may need to back into the Properties box anyway to turn on the Compatibility Mode as this may not be checked, however, the compatibility you need should already be selected still.
You could also need to check “Run this program as administrator” too. Make sure you click “Apply” afterwards.
And that’s it! Enjoy drawing with Windows 10! Don’t forget you might need to set up your tablet settings again too and change your Maximum Canvas size in Others > Options > Workspace Usage
I should also say that this method would work with other programs too, including Manga Studio and Clip Studio Paint.
I hope this helped! Please reblog this to help others!
I can’t stress enough the importance of stretching your hands, and forearms every morning and every evening, spend 5-10 minutes going through a stretching routine. These are very easy to do, takes little time to do them.
It’s VERY common in all animation studios. Conditions can slowly develop, the most typical one is Repetitive Strain Injury, it’s a prevalent condition resulting from overusing the hands to perform a repetitive task, such as typing, clicking a mouse, writing, and of course drawing. In simple medical terms, repetitive strain injury (RSI) stems from prolonged repetitive, forceful, or awkward hand movements. The result is minor damage to muscles, tendons, and nerves of the neck, shoulder, forearm, and most commonly hand and wrist, which can cause pain, weakness, or numbness.
If you’re feeling some pains, tingles, weakness, or numbness in the wrist/forearm; one of the best ways to heal quickly are ‘Contrasting Baths’.
What crazy voodoo am I speaking of? A couple different physiotherapists and massage therapists had recommended this technique to me several years ago, and for anyone I knew that tried it, they all say the results are fast and effective.
Commonly used by carpal tunnel suffers, it’s a method of treating muscle soreness, swelling and inflammation, it’s also known as Hot/Cold Immersion Therapy.
You can use the double sink in your kitchen at home, if you don’t have one, then get your hands on two very large identical bowls, it needs to be big enough to submerge your entire forearms from wrist to elbow.
Fill one up with ice cold water (with a couple dozen ice cubes floating in there). The other with very warm water, not tea-kettle boiling hot water, just hot tap water, or as warm as you can handle, no sense in burning yourself of course.
Have a stop watch or clock ready, and submerge your arms for 30 seconds in the hot, then switch to doing 30 sec. in the cold, and repeat a few times back and forth, 30 sec. a piece. After only a few times you’ll notice the hot water getting cooler and the cold water getting warmer, so then the technique grows to be less effective, but by then, the job is done.
The idea is that the extreme heat and cold contracts and expands your blood vessels, promoting greater blood flow to circulate and flush through your arms, and increased blood flow is what aids in healing faster!
In the past, I’ve gotten some questions about the business of illustration & about how taxes work. Filing taxes is a bummer, but it sucks even more when you have no idea what you’re doing. After progressing from Completely Clueless to Somewhat Experienced* during the past 5 years of doing my own taxes, I thought i’d write (& illustrate!) a generalized rundown. Here’s hoping it might provide some insight for the curious!
*This info is from my own experience and I am by NO means a tax professional! I’m simplifying a lot of the info here, so please don’t take my word as law—check out the specifics on the IRS website instead.
First, the basics:
If you earn an income, you have to pay income taxes, and Uncle Sam has a “pay as you go” system. If you want to avoid a pricey penalty, you are expected to pay taxes throughout the year as you earn income, not all at once when you file your income tax return. There are 2 ways this happens:
1. For people who receive regular paychecks from an employer, your employer will withhold a certain amount from your paycheck to pay for federal (and state) income taxes—you fill out a W-4 form when you’re hired, which determines how much they withhold for you. Easy-peasy!
2. If you’re a freelancer, you don’t have a regular paycheck or a regular employer to withhold your taxes for you, so you have to pay quarterly Estimated Taxes yourself. Estimated taxes cover your income tax and self employment tax*, for both the federal gov’t and your state gov’t (if applicable).
*Yes—as a freelancer, you not only have to pay income tax, but you also pay self employment tax! (basically, a tax that goes to Social Security/Medicare)
I’m just going to focus on federal estimated taxes first:
If you’re a freelancer, the trick is to make sure you pay enough in estimated taxes throughout the year to avoid the underpayment penalty.
You will avoid the penalty if you:
Owe less than $1000 in taxes after subtracting withholding and credits
OR
(A)Have paid at least 90% of the tax amount owed for the current year, or (B) have paid at least 100% of the tax shown on last year’s return — whichever is smaller.
So let’s break down these scenarios a bit:
If you’re a student just graduating from school and you haven’t done many freelance jobs (i.e. probably making less than $8,000 in taxable income from freelance), it’s likely that you don’t have to pay estimated taxes, because you’ll probably owe less than $1000 in federal taxes from your freelance work. So don’t sweat it!
If it does look like you will owe $1000 or more in taxes, you have 2 choices for calculating how much to pay in estimated taxes—the aforementioned (A) or (B).
(A) Make sure you pay at least 90% of the tax amount that will be owed for the current year.
OR
(B) Make sure you pay at least 100% of the tax shown on last year’s return.
Since my freelance income fluctuates and I’m lazy enough that I don’t like trying to predict how much tax I will owe for the upcoming year (and adjust quarterly payments if needed), I prefer to just use option (B).
That means that I can just pay an equal amount each quarter, and make sure all 4 estimated tax payments add up to the tax amount I paid for last year’s return (or more).
So, for instance, if I owed $7000 total in federal taxes for 2012, I won’t be penalized for underpayment if I pay at least $1750 each quarter ($7000 total) for my 2013 federal estimated taxes—regardless of whether I owe more taxes in 2013 or not. If I earned a higher income in 2013 than in 2012 and didn’t pay enough estimated taxes to cover it all, I’d still have to pay the difference at tax time, but at least I wouldn’t have to pay the underpayment penalty!
Not too difficult, so long as you have enough in your bank account, but tricky to figure out at first!
All of this information also generally applies to state estimated tax payments, though the specific numbers and percentages can change and a few states don’t charge income tax at all. In most states, you have to pay a state income tax as well as a federal income tax, so I pay quarterly estimated tax payments to the federal government, as well as quarterly estimated tax payments to Maryland, my state of residence.
Your state will also likely have a free online tax system you can use.
Some tax filing methods:
-Just use a tax professional! Seriously, especially if this is new to you and you don’t have any outside help. I know plenty of professional illustrators that use one. Better than messing things up and getting in trouble with the IRS.
-Use online tax software that helps to walk you through the tax experience and will do all the calculations for you, like TurboTax, TaxAct, etc. (I use TaxAct) They usually have a free version for your federal returns well as pay options, (which may include your state return as well). They will also let you schedule your federal estimated taxes, which I take advantage of. I recommend having a tax-savvy friend or relative you can call if you get stuck! I owe huge debts of gratitude to my own tax-savvy relatives that patiently answered questions & put me on the right track.
OR
-Print out all the pertinent tax forms and worksheets, start to fill them out by hand, alone in your paper-strewn room, and then jump out the window in wild frustration when you can’t figure out all the jargon and your math skills aren’t as good as they used to be.


First, the basics:
If you’re a freelancer, the trick is to make sure you pay enough in estimated taxes throughout the year to avoid the underpayment penalty.
That means that I can just pay an equal amount each quarter, and make sure all 4 estimated tax payments add up to the tax amount I paid for last year’s return (or more).
Some tax filing methods: